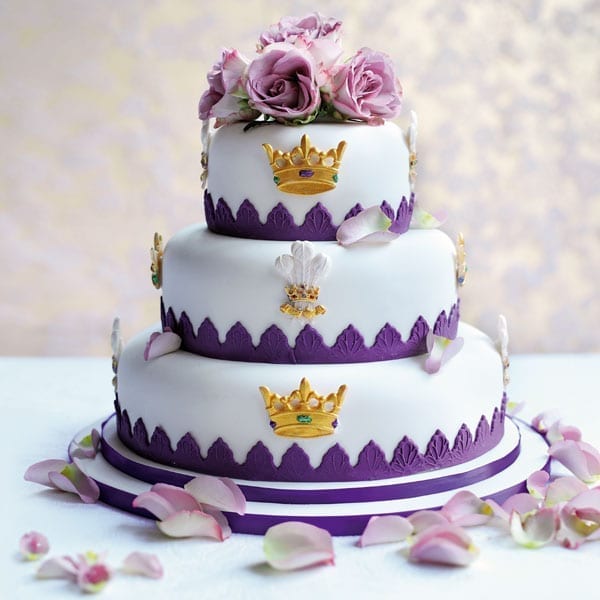
Inspired by the royal wedding of Prince William and Kate Middleton, master patissier, Eric Lanlard created this regal beauty. It’s not a quick recipe, but then, you can’t hurry class.
Eric Lanlard’s fit for a king cake
Cookbooks |
October 2014
Inspired by the royal wedding of Prince William and Kate Middleton, master patissier, Eric Lanlard created this regal beauty. It’s not a quick recipe, but then, you can’t hurry class.
Your cake decorating kit
1 x 15cm round deep cake tin
1 x 23cm round deep cake tin
1 x 30cm round deep cake tin
1 x 15cm thin cake board
1 x 23cm thin cake board
1 x 35cm (12mm thick) cake board
1 x 40cm (12mm thick) cake board
Long serrated palette knife (or a bread knife)
Flat palette knife
String for measuring
3.5kg white sugarpaste (also known as fondant icing)
Long rolling pin
Clean paint brush
2.5 metres x 12mm thick purple ribbon
Wood and/or fabric glue
8 plastic cake dowels
200g purple flower paste
100g purple sugarpaste
Border embosser and cutter (we used FMM Textured Lace Set 1 from squires-shop.com)
Crown silicon mould (from fpcsc.co.uk), or a mould of your choice
Prince of Wales feather silicone mould (from fpcsc.co.uk) or a mould of your choice
Edible gold dust and coloured glitters in blue, red and green
Fresh edible flowers for decorating
Small piping bag
Flower spike/posy pick
The whole cake will serve 120 people. The Cakes take 1 hour 15 minutes to make (not decorate), 6 hours 40 minutes to cook (baked individually), plus cooling. Icing the cake takes half a day
Stage 1 – Making and preparing the cakes
Top tier – Lemon cake
Takes 20 minutes to make, 1 hour 55 minutes to cook, plus cooling
260g unsalted butter, softened, plus extra for greasing
260g caster sugar
4 medium free-range eggs, beaten
375g plain flour
1½ tsp baking powder
Grated zest and juice of 1 large lemon
1. Preheat the oven to 160°C/fan140°C/gas 3. Butter and line a 15cm x 8cm deep cake tin. Cream together the butter and sugar with an electric hand whisk for 5 minutes until light and fluffy, then gradually whisk in the eggs until well blended.
2. Sift the flour and baking powder into the bowl. Using a large metal spoon, gently fold them into the batter along with the grated lemon zest and juice.
3. Spoon into the prepared tin and bake for 1 hour 55 minutes or until golden, springy to the touch and a skewer inserted into the centre comes out clean. Leave to cool in the tin for 5 minutes before turning out onto a wire rack to cool further.
4. Take the completely cooled cake, trim off the domed top with a long serrated palette knife or bread knife, then turn it upside down. Using the same knife, cut the cake horizontally into 3 equal layers.
Middle tier – Carrot cake
Takes 30 minutes to make, 3 hours to cook, plus cooling
Butter for greasing
6 medium free-range eggs
440g soft light brown sugar
450ml groundnut oil
500g self-raising flour
2½ tsp ground cinnamon
2½ tsp ground nutmeg
500g carrots, finely grated
250g sultanas
250g chopped mixed nuts
1. Preheat the oven to 150°C/fan130°C/gas 2. Butter and line a 23cm, deep cake tin with baking paper. Beat together the eggs, sugar and oil with an electric hand whisk for 5 minutes until the mixture is thick enough to leave a trail when the whisk is lifted out.
2. Mix together the flour, cinnamon, nutmeg, carrots, sultanas, nuts and a pinch of salt in a separate bowl. Then, using a large metal spoon, gently fold this into the egg mixture until evenly blended.
3. Spoon into the prepared tin and cook for 2¾-3 hours or until the cake is well risen, firm to the touch, and a skewer inserted into the centre comes away clean. Leave to cool before removing from the tin.
4. Once the cake is completely cool, trim off the domed top with a long serrated palette knife or bread knife, then turn it upside down. Using the same knife, cut horizontally into 3 equal layers.
Bottom tier – Chocolate cake
Takes 25 minutes to make, 2 hours 30 minutes to cook, plus cooling
1.2kg unsalted butter, softened, plus extra for greasing
1.2kg caster sugar
18 free-range medium eggs, beaten
1.1kg plain flour
2 tbsp baking powder
80g cocoa powder
150ml milk
1. Preheat the oven to 160°C/fan140°C/gas 3. Butter and line a 30cm, deep cake tin with baking paper. Wrap a double layer of baking paper around the outside of the tin and secure with string (this will help to prevent over-browning during cooking). Cream together the butter and sugar with an electric hand whisk for 5 minutes until light and fluffy, then gradually whisk in the eggs until well blended.
2. Sift over the flour, baking powder and cocoa powder, then use a large metal spoon to fold this gently into the cake batter along with the milk.
3. Spoon the mixture into the prepared tin and bake for 2¼–2½ hours until the cake is springy to touch and a skewer inserted into the centre comes out clean. Leave to cool in the tin for about 5 minutes before turning out onto a wire rack to finish cooling completely.
4. Trim off the domed top with a long serrated palette knife or bread knife, then turn upside down. Cut into 3 equal horizontal layers.
Stage 2 – Icing the cakes with buttercream
Each tier of the cake is sandwiched and coated with buttercream. Before you begin, make sure you have everything you need ready. Start by glueing the 35cm board on top of the 40cm board to create a stepped board. The buttercream-covered cakes can be kept in a cool dry place for up to
3 days, but don’t freeze them.
625g unsalted butter, softened
850g icing sugar, sifted
125ml milk
1½ tbsp vanilla extract
1. Using an electric hand whisk, beat together the butter, icing sugar, milk and vanilla for 5 minutes until smooth.
2. Working on one cake at a time and using a palette knife, spread
a generous amount of buttercream between each layer, then finally spread a thin layer around the side and top, so the entire cake is covered.
3. Using a little buttercream as an adhesive, gently place the lemon cake on the small cake board, the carrot cake on the medium cake board and the chocolate cake on the large, stepped board.
Stage 3 – Covering the cakes with sugarpaste icing
3.5kg white sugarpaste (also called fondant icing and available ready-made from major supermarkets)
Icing sugar to dust
1. Before you start, use 3 pieces of string to measure each cake: up one side, across the top and down the other side. Cut to the correct length and use them to make sure you roll out the icing to the correct size.
2. Before rolling out the sugarpaste, knead it really well so it becomes soft and pliable. Lightly dust a clean work surface with icing sugar and roll out 600g of the paste into a circle a little larger in diameter than your shortest piece of string, turning it every roll or so to prevent it sticking.
3. Once you’ve rolled out the circle to the right size, carefully lift it up using a rolling pin and lay the centre over the lemon cake, letting the sides drop down onto the work surface.
4. Use a little ball of sugar paste tightly wrapped in cling film to smooth the icing, sweeping it in circular motions across the top and down the sides, gently pushing it down to the bottom and in at the base. Cut off the excess at the bottom.
5. Repeat with the other 2 cakes (using the lengths of string as a guide), rolling 1kg sugarpaste out for the carrot cake and 1.3kg sugarpaste out for the chocolate cake.
6. Next you’ll need to cover the stepped cake board with sugarpaste. Roll out a 5cm x 115cm strip and use a sharp knife and a ruler to cut a straight edge on one side.
7. Brush the top board with water. Press the straight edge of the icing strip around the cake’s base, so the exposed board is covered with icing.
8. Gently smooth the two ends together (the join can go at the back of the cake) and trim the icing with a sharp knife so it’s flush with the edge of the cake board.
9. Stick ribbon around the side of the cake board with a little glue, making sure the join matches up with the join in the icing. Repeat the process on the lower board, rolling out a strip of sugarpaste to 5cm wide and 120cm long this time. The cakes are now ready for stacking.
Stage 4 – Stacking the cakes
To stack the cakes, you need to insert cake dowels into the bottom 2 layers. These will provide a sturdy platform for the top cakes to rest on.
2 medium free-range egg whites
1 tsp lemon juice
400g icing sugar
1. To make the royal icing, mix together the egg whites, lemon juice and icing sugar a little at a time until smooth and firm, but not too stiff to pipe. Cover the bowl and set aside.
2. You need 4 dowels in the bottom cake, forming the corners of a 12cm square in the centre. Push the first dowel straight down to the base. With a pencil, draw a line on the dowel at the level of the icing. Take the dowel out and cut it slightly above this mark. Cut 3 more to the same length and push all 4 into the cake (rounded-side down) to make the square.
3. Spread a little royal icing over the top of the dowels and the cake inside the square. Carefully rest the next tier on top, centering it.
4. Repeat the process on the middle tier, making an 8cm square in the centre with 4 more dowels, and place the final tier on top. Keep the leftover royal icing to stick the crown and feather moulds onto the cake.
Stage 5 – Making and assembling the border
Flower paste gives icing elasticity, making it easier to handle when making more intricate designs.
You need cooled boiled water for the last 2 stages.
If you can’t find the shade of flower paste you’re after, tint white paste with the appropriate food colouring.
Cornflour for dusting
300g purple flower paste
150g purple sugarpaste
1. Lightly dust the work surface with cornflour and knead together the flower paste and sugarpaste until well mixed. Roll out into a rectangle the thickness of a 10p piece. Use a sharp knife to cut a straight edge. Using this as a guide, starting in one corner, push down the embosser to create a pattern. Carefully lift it off, then use the border cutter to cut out the border shape. Cut the ends with a sharp knife to neaten them up. Repeat to use the remaining icing.
2. Brush sterile water (cooled boiled water – see tips) around the bottom of each cake, one at a time, then gently stick all the border sections in place. Smooth the joins with your fingers.
Stage 6 – Making the decorative moulds and finishing the cake
Cornflour for dusting
300g white flower paste
Edible gold dust
Edible coloured glitters in blue, red and green
1. Sprinkle a little cornflour into each mould. Roll the flower paste into a ball and press it into the mould. Trim any excess. Carefully ease it out of the mould. Leave on kitchen paper to dry.
2. Once the pieces are dry, brush the areas on each piece that you want to colour with a little sterile water and, when this is almost dry, use a brush to apply the gold dust. Paint the glitter onto the jewels in the various shapes, tapping off any excess.
3. Put a blob of icing halfway up the bottom cake, and use this to stick on a crown. Repeat in the same place on the level above with the feathers, and on the top cake with another crown. Give the cake a quarter turn and repeat until you have 4 evenly spaced lines of decoration.
4. Just before serving the cake, secure a spray of fresh flowers to the top using a flower pick, then sprinkle some petals around it. Voilà
Subscribe to our magazine
Food stories, skills and tested recipes, straight to your door… Enjoy 5 issues for just £5 with our special introductory offer
By joining our newsletter you agree to our
Privacy Policy
