How to decorate your Christmas cake with gingerbread houses
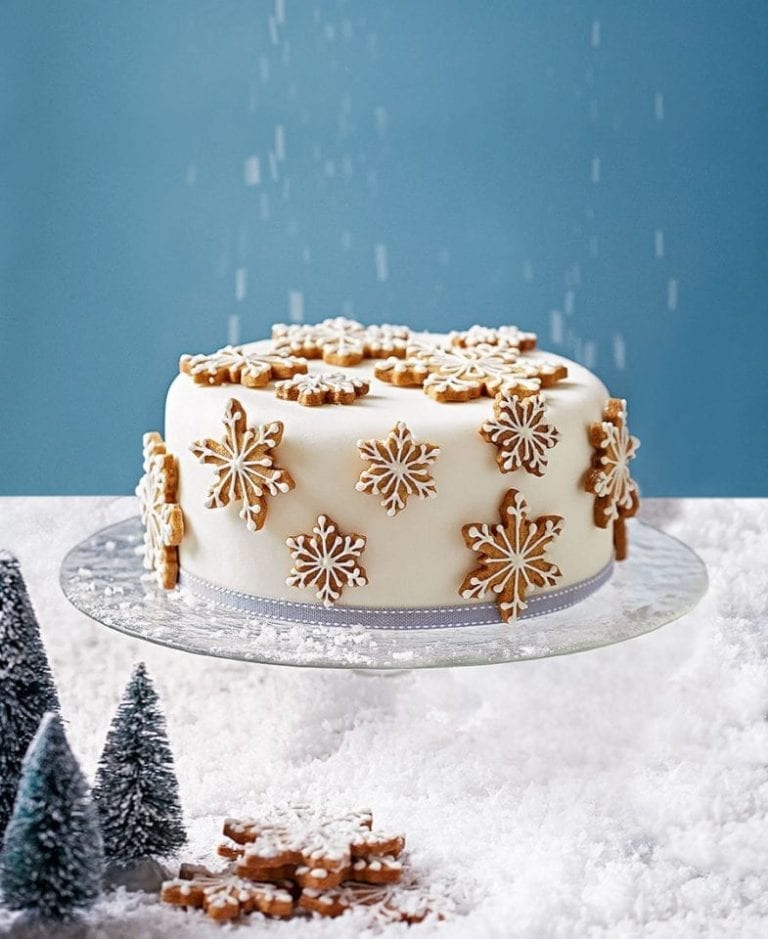
What do you get if you cross a gingerbread house with a Christmas cake? This beauty of an iced creation, that’s what. Designed exclusively for delicious. by Bettys, the famous Harrogate bakers, it has the wow factor while being do-able. Course tutor Jenny Culvers, who teaches at the Bettys Cookery School, shows you how it’s done – and shares all her top tips.
We’ve used Chetna Makan’s amazing saffron and pistachio Christmas cake as the base, but you can apply the decoration to a traditional cake of the same size if you prefer. Oh, and no stealing the biscuits before the cake’s ready to be cut!

”So much time and effort go into making a good Christmas cake: the soaking of the fruit, the long bake and the nurturing as you feed the baked cake with your favourite tipple,” says Jenny Culver. “That love and attention are obvious when you taste the finished cake. For me, though, it’s the marzipan, icing and decoration that really make a Christmas cake great. I’m the person who sneaks uneaten lumps of icing from people’s plates.
The taste takes me back to baking Christmas cake with my mum – snaffling a rum-soaked cherry or a piece of marzipan, and dipping a finger into the bowl of fluffy royal icing before she gave the cake its final gilding. My decorative design here takes a little bit of time (there are up to three days of drying) but it’s simple to achieve. And because the cake is surrounded with a gingerbread village of spiced biscuit houses, I like to think the whole thing will appeal even to those who aren’t so keen on the traditional cake within.”

You will need:
- 23cm round fruit cake
For the cake covering
- 8 tbsp apricot jam, beaten
- 500g white marzipan
- 2 x 570g bags icing sugar, plus extra to dust
- 6 medium free-range egg whites, lightly beaten (beat ½ tsp sugar into the yolks, then freeze to use for custard)
For the biscuits
- 460g plain flour
- 1 tsp bicarbonate of soda
- 2 generous tbsp ground ginger
- ½ tsp ground nutmeg
- ¼ tsp ground cloves
- 120ml clear honey
- 170g soft dark brown sugar
- 240g unsalted butter for the biscuit icing
- 3 medium free-range egg whites, beaten
- 360g icing sugar
You’ll also need…
- 25cm cake board
- Cake smoother (from cake shops or online)
- Christmas tree biscuit cutters
- 2 house-shaped cutters or spiced biscuit templates
- Piping bags and plain number 1 and 2 icing nozzles
Jenny’s tips for success:
- Turn your cake upside-down before covering it in marzipan – the sharper edges of what was the bottom will give the finished cake a neater appearance.
- When smoothing royal icing over the cake, use a long ruler or palette knife (longer than the diameter of the cake) to scrape across the top. This will make it easier to achieve a perfectly smooth top.
- You can ice the biscuits and keep them for up to 5 days in an airtight container somewhere cool. The icing will begin to turn from white to cream after a few days – perfect if you want a more vintage look to your biscuits.
Make ahead
- You can make the biscuits up to 5 days ahead and store in a cool place.
Food team’s tips
- When covering the cake with the marzipan (step 2), having a cake smoother to hand can help you smooth down the sides and prevent fingerprints in the marzipan (it doesn’t have to be perfect as it will be covered with royal icing afterwards).
- If there are any large holes in the cake where fruit has sunk, roll up a little extra marzipan and use to plug the gaps, so you have a smoother surface that’s easier to cover with royal icing.
- The gingerbread recipe makes more biscuits than you’ll need for the cake. Leftover biscuits can be stored for up to 2 weeks in an airtight container.
Makes 30 biscuits. Hands-on time 40 min, oven time 10-12 min, plus chilling and 24-48 hours drying time
1. To decorate the cake, turn it upside-down (see Jenny’s tips) and secure it to the board with a little apricot jam. Mould the marzipan into a smooth ball and lightly dust the work surface with icing sugar. Roll out the marzipan into a circle large enough to cover the top and sides of the cake, to the thickness of a pound coin. Lightly brush the sides and top of the cake with the beaten apricot jam.
2. Roll the marzipan onto the rolling pin, then unroll it onto the centre of the cake. Ensure the top is even, then encourage the sides to cascade into place. Smooth with your hands, then with a cake smoother.

Trim away the excess from the bottom edge with a knife. Smooth again, then set the cake aside for 24-48 hours for the marzipan to dry out.

3. When the marzipan has dried, make the royal icing for the cake. Put the egg whites into a large, clean, grease-free bowl with half the icing sugar. Beat lightly using an electric mixer until smooth. Beat in the rest of the icing sugar by mixing on a slow speed for 1 minute, then on medium-fast for 4-5 minutes until the mixture begins to whiten and hold its shape, but is still soft enough to work with.

4. Spread the royal icing over the top and sides of the cake using a palette knife (see Jenny’s tips), levelling it smooth or making a slight swirl pattern.

Pipe a line of icing around the rim of the cake in a wavy pattern using the number 2 nozzle. Leave it to dry overnight somewhere cool.

5. The next day, make the biscuits. Heat the oven to 200°C/180°C fan/gas 6 and line 3-4 baking sheets with non-stick baking paper. Put the flour, bicarbonate of soda, ground ginger, nutmeg and cloves into a large mixing bowl.
6. Warm the honey, sugar and butter in a heavy-based saucepan over a low heat until the butter has melted and the sugar has dissolved.
7. Make a well in the dry ingredients, then pour in the wet ingredients and mix until you get a firm dough. Allow to cool for 10-15 minutes.
8. Roll the dough between 2 pieces of non-stick baking paper until 0.5cm thick, then chill in the fridge for 30 minutes or until firm.
9. Peel back the top layer of paper and, using house biscuit cutters, cut out trees and houses – you’ll need around 7 houses and 7 trees for the cake. Transfer the biscuits to the prepared baking sheets and bake for 10-12 minutes until golden around the edges. Remove from the oven and allow to cool, leaving the biscuits on the sheet to firm up. Once cool enough to handle, put the biscuits on a wire rack to cool.

10. Make the royal icing for the biscuits using the same method as for the cake (step 3), then scrape the icing into 2 piping bags, one fitted with a number 1 nozzle and the other fitted with a number 2 nozzle. Before piping, twist the bags to create tension and hold the bag between your thumb and forefinger. Use your other hand underneath to guide the bag, to prevent too much icing coming out at once.
11. Using your top hand, apply light pressure and watch the icing fall from the bag. Think of it as dropping a piece of rope, rather than drawing. Edge each house using the size 2 piping nozzle. Add extra details with the thinner nozzle for window ledges and roofs.

12. To ice the Christmas trees, draw an outline using a size 2 nozzle, then fill in the centre with more icing. Leave to dry for 2-3 hours (see Jenny’s tips and Make Ahead).

13. Measure the biscuits around the edge of the cake to work out the spacing, then pipe a pea-size amount of icing on the back of each biscuit and secure them to the cake, placing them as close together as possible. Leave to dry for 1-2 hours before serving the cake.

Keen to make more Christmas biscuits? Discover all our recipes, from spiced lebkuchen to chocolate snowballs.
Subscribe to our magazine
Food stories, skills and tested recipes, straight to your door... Enjoy 5 issues for just £5 with our special introductory offer.
Subscribe
Unleash your inner chef
Looking for inspiration? Receive the latest recipes with our newsletter
