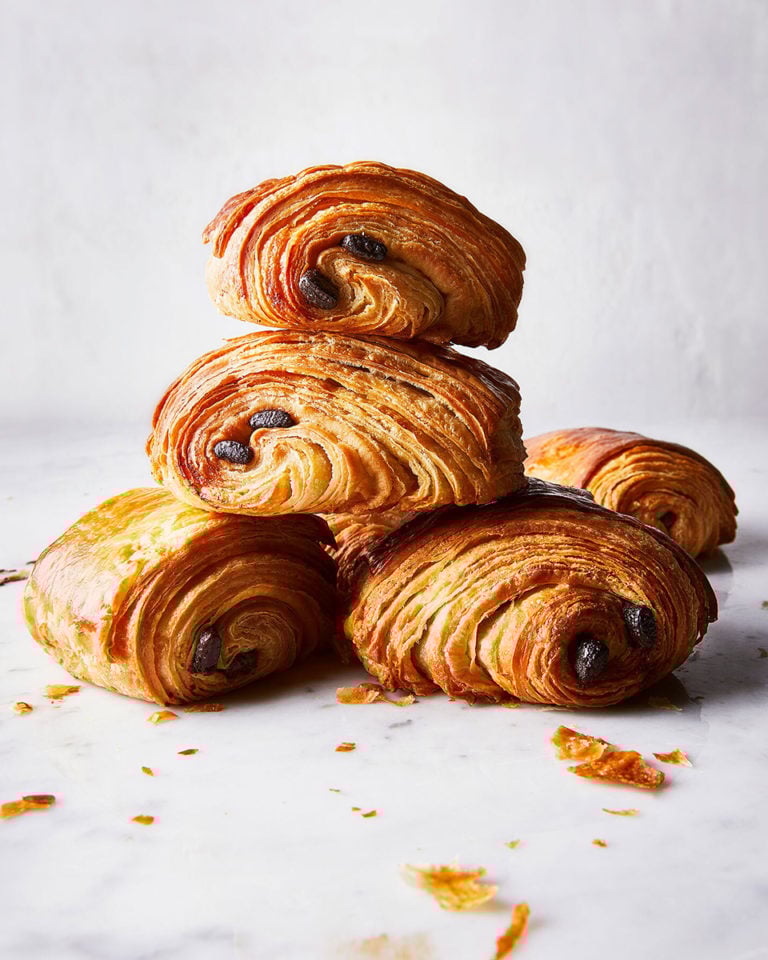
Pain au chocolat
- Portion size: Makes 12 pastries
- Hands-on time 30 min, plus proving and resting – start this recipe 2 days before you want to eat the pastries.
- Difficulty: medium
Warm, golden pastries fresh from the oven could soon be yours. Learn how to make pain au chocolat from scratch with Edd Kimber’s step-by-step recipe. Start the recipe a day or two ahead, for perfect lamination results.
Known as @theboywhobakes, Edd’s childhood passion for baking led him to enter – and win – the first series of The Great British Bake Off. He has since become a popular food writer, blogger and TV personality, and is the author of four cookbooks on baking.

Join Extradelicious to unlock Cook Mode
Ingredients
For the dough
- 500g strong white bread flour
- 50g caster sugar
- 10g fine sea salt
- 135ml whole milk
- 135ml water
- 20g fresh yeast or 7g sachet fast-action dried yeast
- 50g unsalted butter, softened
For the lamination
- 250g unsalted butter (see Know How)
For the filling and glaze
- 24 chocolate batons (see Know How)
- 1 medium free-range egg
- 1 tsp double cream
- 1 tsp honey
- Pinch fine sea salt
You’ll also need…
- Stand mixer
- Ruler or measuring tape
Useful to have…
- Instant-read digital thermometer
Join Extradelicious to unlock Cook Mode
Method
Day 1: Make the dough
- Mix the flour, sugar and salt in the bowl of a stand mixer (or in a large bowl if mixing by hand). In a jug, whisk together the milk, water and yeast. If using fresh yeast, whisk until the yeast has dissolved into the liquid. Make a well in the dry ingredients and pour in the milk mixture. With the dough hook attached, mix on a low speed (or use your hands) to combine the ingredients into a shaggy dough. Turn up the speed to low/medium and knead the dough for 2-3 minutes, then add the butter and continue kneading for a total of 8 minutes (or 10-15 minutes by hand) until smooth and slightly elastic. You want the gluten to begin forming but not fully develop, as this can make the dough hard to roll out when laminating.
- Form the dough into a ball, put in a lightly greased bowl and cover tightly with cling film. Allow to sit at room temperature for about 30 minutes to kick-start the fermentation, then refrigerate overnight.
- To prepare the butter for lamination, cut it into 3-4 thick slices. Take a large sheet of baking paper, draw a 20cm x 20cm square on one side, then turn the paper over and lay out the butter in a relatively even layer, using the drawing as a template. Fold the excess paper over the butter, following the shape of the template so the butter is fully encased in paper. Using a rolling pin, repeatedly bash the butter to soften it and make it more pliable, then roll out the butter to form a neat square, conforming to the shape of the template again – try to make it as neat and even as possible. Put the butter square in the fridge overnight.
Day 2: Laminate and shape
- Remove the butter and dough from the fridge and set the butter aside while you work on the dough. On a lightly floured worksurface, roll out the dough into a 20cm x 40cm rectangle, trying to keep the shape as sharp and straight as possible. Brush off any excess flour and transfer the dough to a tray lined with baking paper, cover with cling film, then refrigerate while the butter comes up to temperature (see Know How). When the butter is nice and pliable, remove the dough from the fridge and set it on a lightly floured worksurface with a shorter side facing you. Ensure the dough is still a 20cm x 40cm rectangle, then unwrap the butter square and set it in the centre. Fold the top and bottom of the dough up and over the butter, pinching the seam closed so the butter is fully encased. Turn the dough 90 degrees so the seam is now perpendicular.
- Lightly flour the dough, then use a rolling pin to gently press the dough several times along its length. This ‘ridging’ helps to flatten the dough slightly and keep it straight when you start rolling. Roll the dough away from you into a 20cm x 60cm rectangle, trying to keep the shape as neat and accurate as possible. Brush off any excess flour and perform the first of two folds, known as a double or book fold. To do this, take the short edge furthest away from you and fold it back over the dough to the middle point. Then take the short edge nearest to you and fold it up, meeting the other end of the dough in the middle. Take the new top edge and fold it over, folding the dough in half like a book. Gently press the dough with a rolling pin along its length to seal the dough together, then wrap in cling film and refrigerate for 30 minutes.
- Put the dough on your lightly floured worksurface with the open seam pointing to your right. Lightly flour the dough and roll it out to 20cm x 60cm as before, brushing off any excess flour. Now it’s time for the second fold, which is known as a single or letter fold. Take the top edge as before and fold it over, leaving one third of the dough exposed. Then fold the bottom edge up and over the rest of the dough – as if folding a business letter. Brush off any excess flour and refrigerate the dough for 30 minutes before you roll and shape the pains au chocolat.
- To shape the pastries, roll out the dough into a rectangle that measures a little over 30cm x 50cm (it will contract slightly). Use a sharp knife to cut it into two 15cm-wide rectangles, then cut each long rectangle into 6 equal-size rectangles (they’ll be just over 8cm wide). Put a chocolate baton along the short edge of a pastry rectangle, then start to roll it up. Once the chocolate is covered, add a second baton and continue rolling up the dough like a swiss roll. Place each finished pain au chocolat onto a lined baking tray, then cover with cling film and refrigerate overnight. You can skip this stage and prove the pastries immediately, but you’ll then end up with pains au chocolat coming out of the oven in the late afternoon.
Day 3: Glaze and bake
- Arrange the pastries over 2 lined baking trays and wrap well with cling film. Prove at 25ºC (see tips) for 2-2½ hours until they have risen and wobble like jelly when the trays are gently shaken. When the pastries have almost finished proving, heat the oven to 180ºC fan/gas 6.
- For the glaze, beat together the egg, cream, honey and salt. Carefully glaze the tops of the pastries, brushing lightly to avoid deflating the dough (see Know How). Bake for 15-18 minutes or until the pastries are golden and well risen. Remove and allow to cool before eating.
Nutrition
- 435kcals Calories
- 25.4g fat (15.6g saturated) Fat
- 7.1g Protein
- 43.6g (12.2g sugars) Carbs
- 1.8g Fibre
- 0.9g Salt


Leave a comment, question or tip