Our step-by-step instructions on how to build a pizza oven in your own back garden using items from your local DIY shop or, better still, picked up for free.
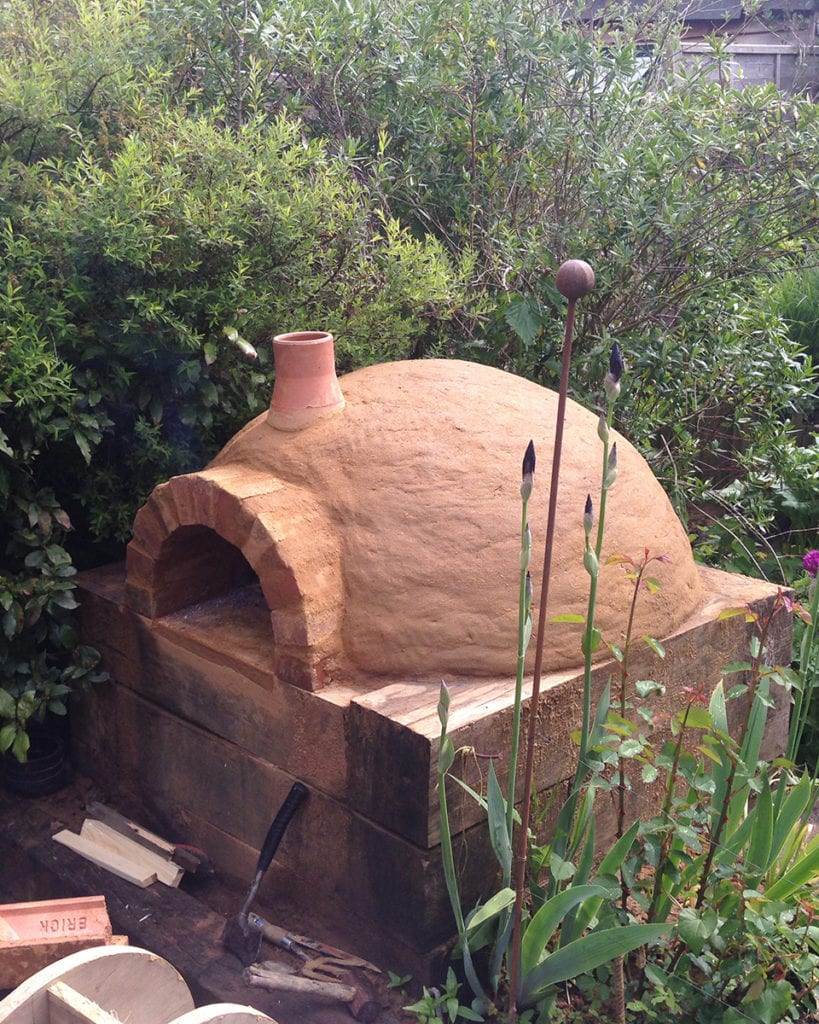
How to build a wood-fired pizza oven
In the garden |
June 2022
Our step-by-step instructions on how to build a pizza oven in your own back garden using items from your local DIY shop or, better still, picked up for free.
Meet the expert
In 2008 Simon Brookes attended a Build and Bake course at Hugh Fearnley-Whittingstall’s River Cottage HQ in Devon, where he learned how to cook in a wood-fired oven and how to build one. “I came home and thought, ‘I’m going to build my own pizza oven,’” recalls Simon. “I’m not practical; I can do basic DIY, but construction is out of my comfort zone. If I can do it anyone can.”
While building his pizza oven Simon started a blog about the project and the food he was cooking in the oven. Soon, would-be oven builders got in touch from all over the world, sharing photos of their ovens and swapping tips. Eventually he put all his experience into an e-book called How to Build a Traditional Wood-fired Clay Pizza Oven.
Simon’s project hasn’t been a mere flash in the pan. “It’s replaced our barbecue,” he says. “A clay oven takes an hour to get up to temperature, but once it does, you’re cooking pizza in 60 seconds, with a crisp base and a fantastic smoky flavour.”
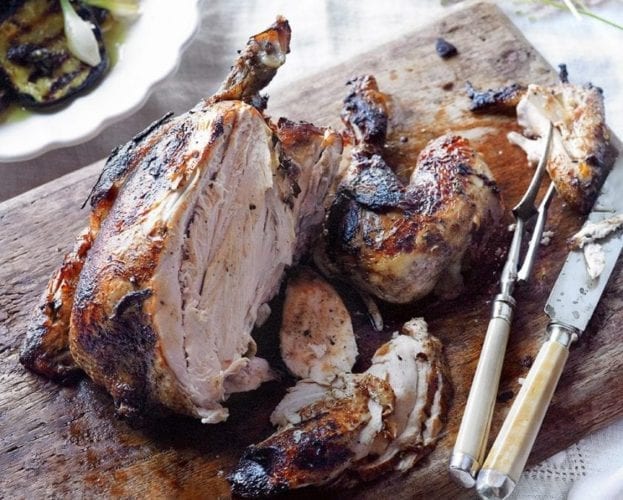
Wood-fired ovens cook at very high temperatures – around 400°C. Domestic ovens can’t get that hot. They’re not just for pizzas, though. Once you sweep out the embers and let it cool a little, the oven’s perfect for slow-roasting. “I’ve cooked joints overnight at around 130°C,” says Simon.
A bit of history
Far from being a new-fangled invention, clay ovens are thousands of years old. The ancient Egyptians used clay ovens and examples have been unearthed in Roman Pompeii that would still work today if cleaned out and fired up. Ovens like these were built in communal areas and shared by families. By Medieval times, the ovens had become bigger and were used to bake bread for entire villages. Many Italian homes had wood-fired ovens inside up until the middle of the 20th century.
Pizza ovens: where to learn to DIY
- Simon runs courses on building and cooking at the Sustainability Centre in Hampshire
- River Cottage offers a Build and Bake course
- Manna from Devon runs two courses on cooking in wood-fired ovens. One focuses on the ovens and cooking at high temperatures. The other looks at using the residual heat for cakes, pastry and slow-cooked pork and lamb. There’s also a free two-hour taster session.
Planning
First, decide where to site your oven. Unlike a barbecue, you can’t move a pizza oven around the garden once it’s built. Choose an area with plenty of space around it – somewhere in full sunlight is good.
How long will it take? You should be able to build it over a summer weekend if the weather’s fine.
What you’ll need…
You can get most of these items from builder’s merchants – if not, we’ve given other options
- About 30 bricks: at least 20 will need to be smooth and solid, with no recess (frog) or holes (perforations), to form your oven floor.
- 20 breeze blocks and 5kg tub of cement or twenty 120cm x 20cm x 20cm wooden beams, an electric drill and long wood screws (for the plinth frame)
- Rubble and big stones
- 10-14 bags of builder’s sand (20kg each)
- 125-175kg clay (the cheapest will do – try angliaclaysupplies.co.uk)
- Assorted glass bottles
- Chimney or plant pot (optional)
- Large bag (14 litres or 6kg) of wood shavings (from pet shops)
You’ll also need…
- Wheelbarrow
- Tape measure
- Large heavy-duty plastic or tarpaulin sheet
- Plenty of water
- Old kitchen knife
- Heavy duty gloves
- 10 litre builder’s plastic bucket
- Wellington boots
- Lots of newspaper
Essential technique: puddling
- Mixing the clay and sand is the hardest, most time- consuming part of the building process. It’s best to mix this in batches as and when you need it.
- For the first layer (step 3) you’ll need about three buckets of clay to six 10 litre buckets of sand. The final shell (step 7) will need four buckets of clay to eight of sand (1:2 ratio clay:sand).
- You do the mixing (puddling) with your feet. Tip the sand onto a large plastic tarpaulin sheet, break the clay into thumb-size pieces and, wearing wellies, tread the two together with a little water. This is called puddling. The mixture is ready when a tennis ball-size piece dropped from shoulder height holds together. If it splats, the mix is too wet; if it cracks, it’s too dry.
Step 1: Make the plinth
Takes about 4 hours
Step 1a
Step 1b
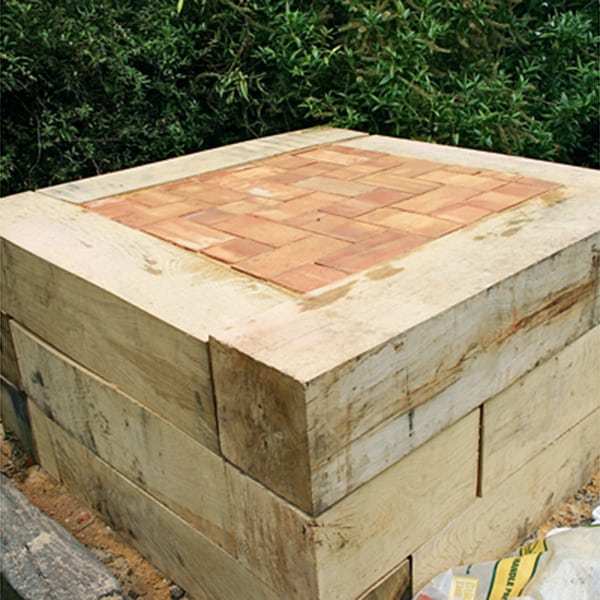
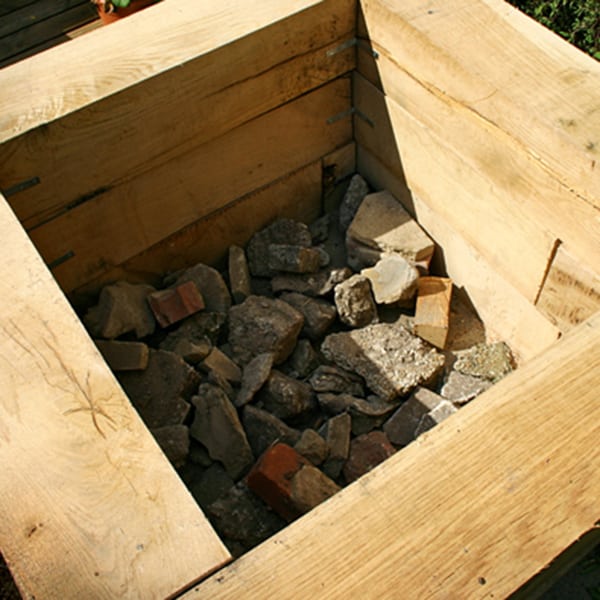
This is the foundation of your oven, so it needs to be solid. You can build the plinth frame out of bricks, breeze blocks or wooden sleepers. Clear the ground and dig a shallow trench 120cm x 120cm square. If you build the frame from bricks, or breeze blocks, use cement. If you’re using wood, screw the pieces together. You’re after a solid, square box approximately 1m high and 120cm square.
Put a layer of rubble and stones in the centre (1a), then add a layer of sand and glass bottles. These will act as a heat sink, warming up, then radiating heat back up through the oven. Finally, top with a layer of smooth, solid bricks (1b) to form the oven floor. Bear in mind this is the surface you’ll cook on, so the bricks need to fit snugly together.
Step 2: Make the dome mould
Takes about 1 hour
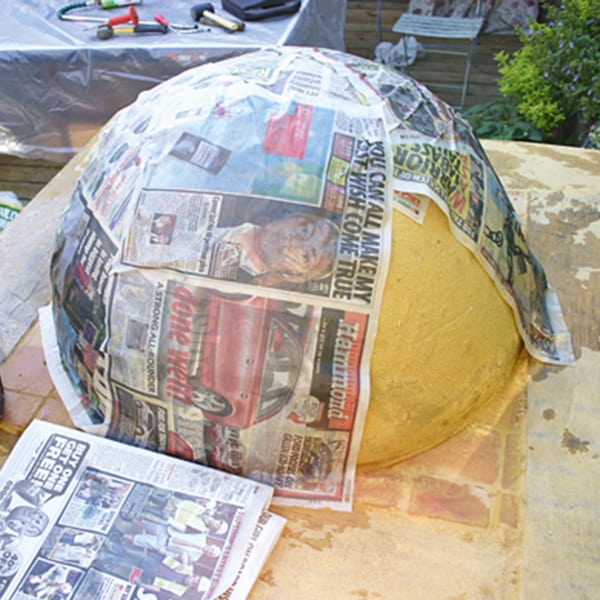
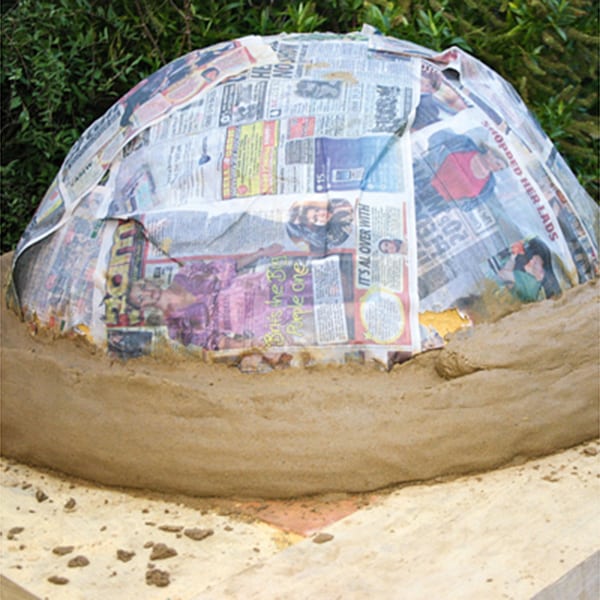
Make a mound of damp sand to form the clay around. You’ll need about 120kg sand. Centre it on the plinth you’ve already built and gradually construct the dome up like a giant sand castle. It needs to be 80cm in diameter at the bottom and 40-45cm high. Keep checking on it from above to make sure it’s round. When it’s finished, cover with wet newspaper to stop it drying out while you puddle the clay (see photo).
Step 3: The first oven layer
Takes about 2 hours, plus 4 hours drying
Roll handfuls of the puddled clay/sand mix into 20cm long, 10cm thick sausage shapes, then build them up in circles around the sand dome, starting from the base (leave the newspaper on), until the dome is completely covered. Work the clay lengths into each other, then smooth the outside with your hands. The layer should be about 7-10cm thick. Leave the clay to dry for 4 hours.
Step 4: Cut the entrance
Takes about 1 hour
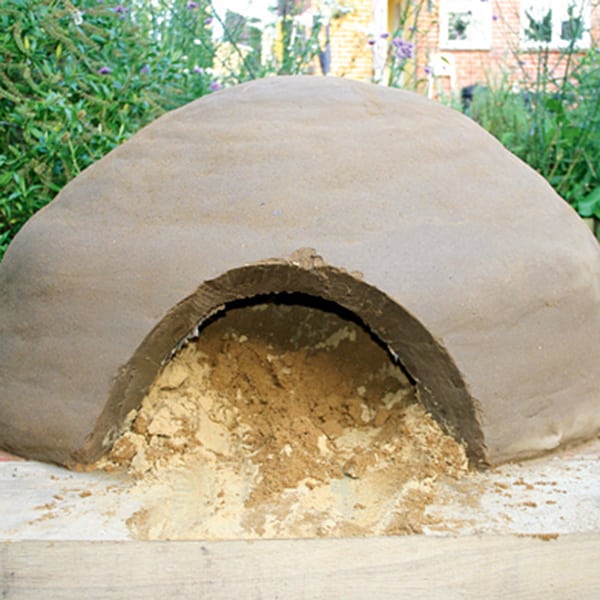
Using a kitchen knife, cut out the entrance to your oven. It needs to be big enough to fit a roasting tray through it, but small enough to keep the heat in – about 30cm wide by 20cm high. Once you’ve cut the entrance, scoop out the sand inside (you can reuse it). Let the dome dry overnight. The next morning, light a small fire inside to help dry out the clay further.
Step 5: Build the brick opening
Takes 2-3 hours
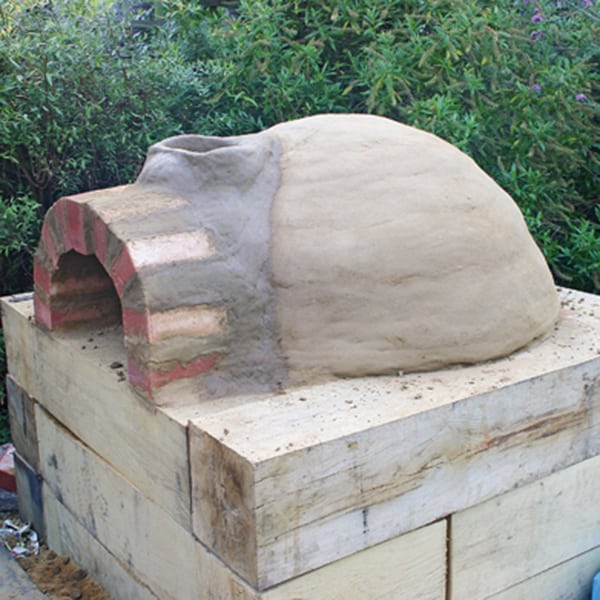
Build an arch to fit around the entrance using bricks and more sand/clay mix as mortar and to create the angle for the arch. Secure the arch to the clay dome with more clay mix. Next, cut a hole in the roof of the dome near where the arch joins the dome and build a clay collar to hold the chimney. You can use a plant pot as a chimney, buy one, or build up rings of clay to make one (as in the photo).
Step 6: The insulation layer
Takes about 1 hour, plus 2 hours drying
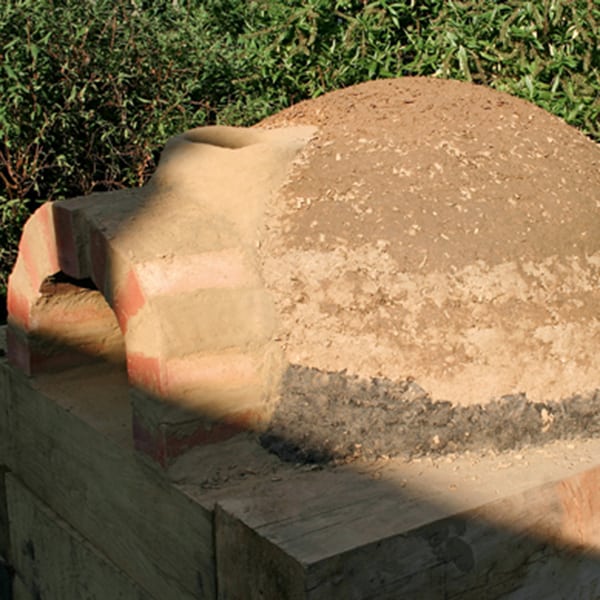
Make 4 litres of slip (a mixture of clay and water with the consistency of cream). Stir in 14 litres/6kg wood shavings until well mixed. Slap the insulation layer onto the clay dome, then leave to dry for 2 hours.
Step 7: The final shell
Takes about 2 hours
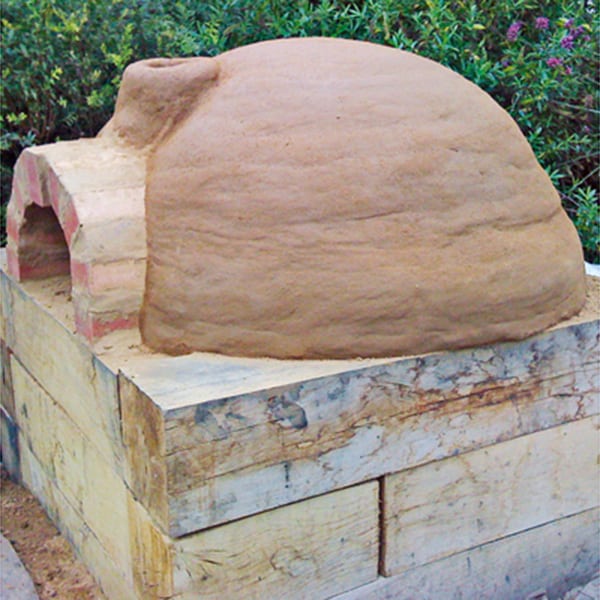
This is the same as the first oven layer, just slightly larger. Mix the clay and sand together by puddling. Make sausage-shape bricks and press firmly together to cover the insulation layer until 7-10cm thick all over. Smooth the surface as in step 3. Once the finished oven has had a chance to dry out for a day or two (a week would be even better), clean out any remaining sand or debris… And you’re ready to fire it up!
How to use your pizza oven
Cooking Obviously you need wood, and proper dried hardwood is best. “Light a pile of newspaper and small sticks of soft wood in the entrance under the chimney,” says Simon. Slowly build the fire by adding pieces of hardwood such as oak then, once it’s going, move it towards the back of the oven – not too quickly, though, or it may go out. “Once it’s roaring, add just enough wood to keep it ticking over,” says Simon.
Care and protection
When not in use, protect the oven from damp with a well secured tarpaulin.
Now you’ve got your oven, get cooking! You can find our favourite pizza recipes here.


Subscribe to our magazine
Food stories, skills and tested recipes, straight to your door… Enjoy 5 issues for just £5 with our special introductory offer
By joining our newsletter you agree to our
Privacy Policy
