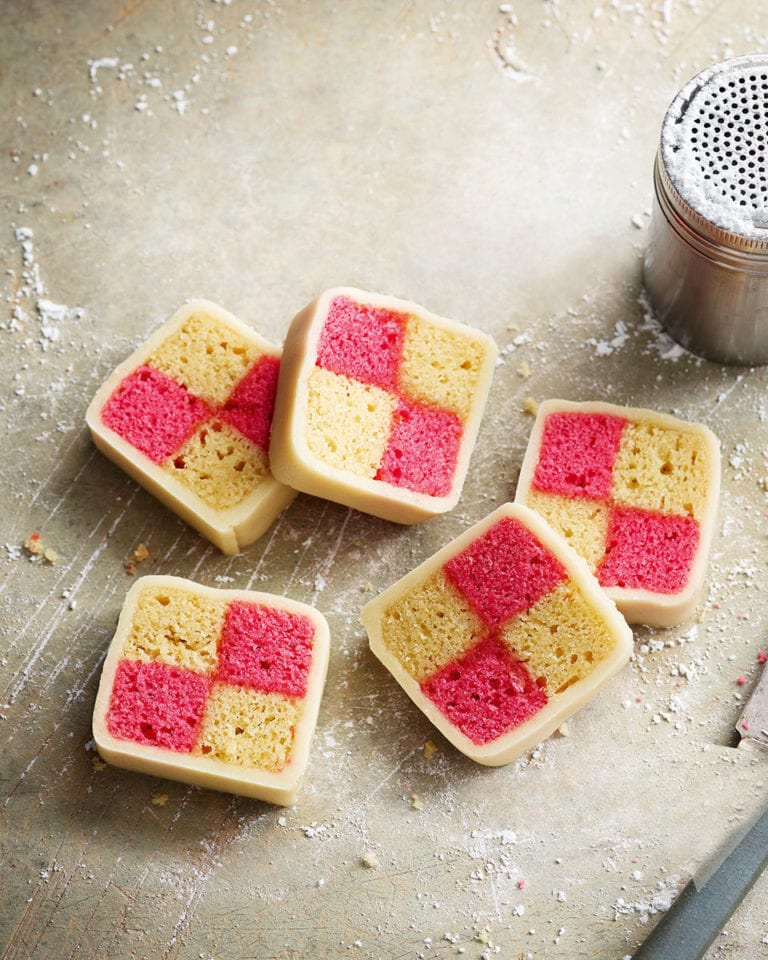
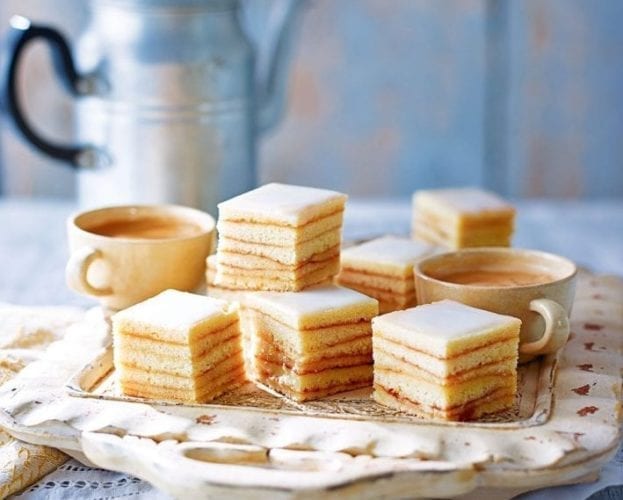
Getting the signature chequerboard effect of the classic Battenberg cake requires a little know-how and a few tricks (it’s all about the central fold in the baking paper). It’s very do-able though, and our step-by-step guide will help your cake look good enough to merit a Hollywood handshake – or at least the admiration of your friends at your next afternoon tea.
Watch our video below for tips on assembling your battenberg.

Join Extradelicious to unlock Cook Mode
Ingredients
- 200g butter, softened, plus extra to grease
- 200g golden caster sugar
- 50g ground almonds
- 3 large free-range eggs, beaten
- 175g self-raising flour
- ½ tsp baking powder
- 2 tbsp milk
- ¼ tsp almond extract
- Pink food colouring (see tip)
- ¼ tsp rose extract or raspberry flavouring (optional)
To assemble
- 150g apricot or raspberry jam
- 500g white marzipan
- Icing sugar for dusting
- Caster sugar for sprinkling
You’ll also need
- 20cm x 20cm square cake tin greased with butter
- Compostable baking paper
- Foil
- Pastry brush
- Kitchen string
Useful to have
- Electric mixer
- Icing smoother (available from Lakeland)
Join Extradelicious to unlock Cook Mode
Method
- Heat the oven to 180°C/160°C fan/gas 4. Cut a sheet of baking paper so it’s 38cm long (usually the width of the roll) and 20cm wide (the width of your tin). Use it to line the base and 2 sides of the greased tin, then grease the paper with butter.
- Cut a second sheet of baking paper to 48cm long and 20cm wide, then cut one of foil the same size. Put the baking paper on the work surface, grease it with butter and lay the foil on top. Fold in half widthways to give a 24cm x 20cm shape, then fold over 5cm of the folded edge. Open out the paper/foil, with the baking paper side up, but keep the 5cm fold together, creasing it so it stands up as a ridge – this will be used to divide the cake tin in half.
- Use the paper/foil to line the base of the tin and the 2 sides that aren’t already lined, making sure the ridge is exactly at the halfway point in the tin. This will enable you to cook the 2 different coloured sponges at the same time.
- Weigh your mixing bowl and write down the weight. Cream the butter and sugar with an electric mixer for 5 minutes until pale and fluffy (you can use a wooden spoon to do this but it will take a bit longer). Mix in the ground almonds. Add the beaten eggs a little at a time, adding 1 tbsp of the flour with the last bit of egg so the mixture doesn’t curdle. Sift over the remaining flour and baking powder, then use a metal spoon to gently fold it in, followed by the milk.
- Weigh the bowl and mixture combined, subtract the weight of the bowl, then scoop exactly half the mixture into a second bowl. Stir the almond extract into one half of the mixture. Stir the pink food colouring and, if using, the rose extract or raspberry flavouring into the other half.
- Spoon the cake mixtures into different sides of the prepared tin, then lightly level the surfaces with a spoon. Bake for 25-30 minutes until a skewer pushed into the centre of each sponge comes out clean. Leave to cool completely in the tin, then carefully lift out the sponges (still on the baking paper/foil) and peel away the paper and foil.
- Trim the sides of each sponge. Put one sponge on top of the other and trim again so they’re exactly the same size (about 9cm x 18cm), then cut both sponges exactly in half lengthways to give 4 long sponges (2 almond, 2 pink).
- To assemble the cake, warm the jam in a small pan with 1 tbsp water. Brush a long side of an almond sponge and a pink sponge with jam and sandwich them together, then do the same with the other pair. Brush the top of one pair with jam and place the second pair on top, alternating the colours that lie against each other to create the classic chequerboard effect.
- To determine the size your marzipan needs to be, cut 2 pieces of string – one as long as the cake and one that’s long enough to go all the way round the middle of the cake. Generously dust a work surface with icing sugar and roll out the marzipan into a rectangle that corresponds in size to your pieces of string (around 18cm x 36cm).
- Lift the marzipan to one side, brush away the excess icing sugar from the work surface and the underside of the marzipan, then sprinkle the work surface with caster sugar and put the marzipan back on top. Give it one more gentle roll so the caster sugar sticks to the underside, then trim the long edges neatly to the exact size of your cake.
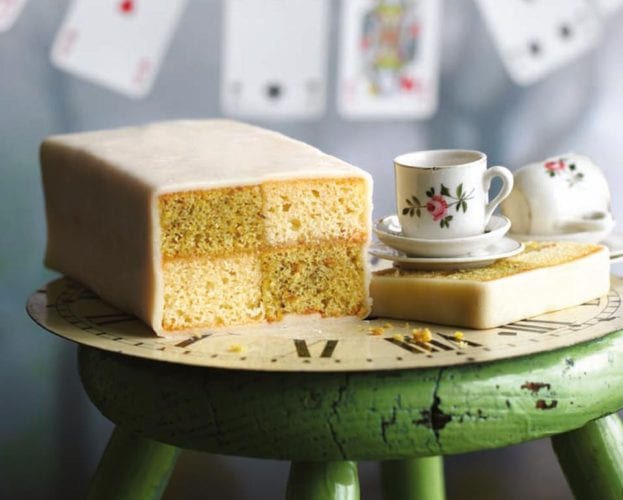
- Brush the marzipan and the top of the cake with jam. Flip the cake over onto the marzipan so it lies exactly across the centre. Brush the remaining long sides of the cake with jam, then wrap the marzipan tightly around the outside, pressing it firmly onto the cake as you do so and bringing the edges together in a neat seam along the top. Use an icing smoother, if you have one, for an extra-smooth finish. Press the edges together to seal.
- Turn the cake over so it’s seamside down and cut a thin slice from each end of the cake to neaten it up. Enjoy a slice straightaway with a cuppa, or see Make Ahead.
Nutrition
- 445kcals Calories
- 20.8g (8.8g saturated) Fat
- 6.3g Protein
- 56.9g (46.9g sugars) Carbs
- 1.5g Fibre
- 0.5g Salt


Leave a comment, question or tip